spring.profiles.active=test 表示启动 application-test.properties 这个配置文件
springboot
1、静态资源目录优先级
META-INF/resources>resources>static>public
localhost:8080/1.png 先去 controller 查找请求,如果查找不到,就再去静态资源查找,如果静态资源也找不到就 404
2、静态资源的访问前缀
假如,我们有个 controller 的请求路径为 1.png ,同时静态资源也有一个1.png,我们的需求就是不改动 controller 的请求路径的情况下,访问静态资源1.png
import org.springframework.web.bind.annotation.RequestMapping;
import org.springframework.web.bind.annotation.RestController;
@RestController
public class MainController {
    @RequestMapping("/1.png")
    public String hello(){
        return "hello";
    }
}
此时可以使用静态前缀来解决,需要在配置文件配置
spring:
  mvc:
    static-path-pattern: /res/**
当我们想要引用 静态资源1.png的时候,需要加上前缀 /res/就可以访问了
localhost:8080/res/1.png
3、更改静态资源存放的位置
当我们需求中不能使用:META-INF/resources>resources>static>public 这四个文件夹作为静态资源存放的位置的话需要在配置文件添加
spring:
  resources:
    static-locations: classpath:/JavaJL/
#也可以写多个文件夹,[classpath:/JavaJL/,classpath:/JavaJL0/]
之后我们的静态资源存放位置就改为了JavaJL
debug 模式启动 springboot
$ java -jar myproject-0.0.1-SNAPSHOT.jar --debug
2、Springboot 多个开发环境设置
创建 3 个 yml 文件 application.yml 和 application-dev.yml 和 application-test.yml
application.yml
spring:
  profiles:
    active: dev
application-dev.yml
server:
  port: 8080

spring:
  datasource:
    username: root
    password: 1234
    url: jdbc:mysql://localhost:3306/springboot?useUnicode=true&characterEncoding=utf-8&useSSL=true&serverTimezone=UTC
    driver-class-name: com.mysql.jdbc.Driver

mybatis:
  mapper-locations: classpath:mapping/*Mapper.xml
  type-aliases-package: com.example.entity
#showSql
logging:
  level:
    com:
      example:
        mapper: debug
application-test.yml
server:
  port: 8080

spring:
  datasource:
    username: root
    password: 1234
    url: jdbc:mysql://localhost:3306/springboot?useUnicode=true&characterEncoding=utf-8&useSSL=true&serverTimezone=UTC
    driver-class-name: com.mysql.jdbc.Driver

mybatis:
  mapper-locations: classpath:mapping/*Mapper.xml
  type-aliases-package: com.example.entity
#showSql
logging:
  level:
    com:
      example:
        mapper: debug
*注意
在 Spring Boot 中多环境配置文件名需要满足 application-{profile}.yml 的格式,其中{profile}对应你的环境标识
3、配置 druid 连接池
导入包
        <dependency>
            <groupId>com.alibaba</groupId>
            <artifactId>druid-spring-boot-starter</artifactId>
            <version>1.2.8</version>
        </dependency>
application.yaml
spring:
  datasource:
    url: jdbc:mysql://localhost:3306/tsingby?serverTimezone=GMT%2B8&useSSL=false
    username: root
    password: root
    #配置数据库连接池的种类
    type: com.alibaba.druid.pool.DruidDataSource
    # 驱动
    driver-class-name: com.mysql.jdbc.Driver
4、springboot 集成 mybatis-generator
先发结构图
首先需要先把 dao 的相关依赖导入到 pom.xml,我的mysql是8版本此处有坑,mysql8 的 url 连接有改变,根据自己 mysql 版本选择。
<dependency> <groupId>org.springframework.boot</groupId>
            <artifactId>spring-boot-starter-jdbc</artifactId>
        </dependency>
        <dependency>
            <groupId>org.mybatis.spring.boot</groupId>
            <artifactId>mybatis-spring-boot-starter</artifactId>
            <version>2.2.0</version>
        </dependency>
        <dependency>
            <groupId>mysql</groupId>
            <artifactId>mysql-connector-java</artifactId>
            <scope>runtime</scope>
        </dependency>

        <dependency>
            <groupId>com.alibaba</groupId>
            <artifactId>druid-spring-boot-starter</artifactId>
            <version>1.2.8</version>
        </dependency>
以数据库表 Users 为例
(1)、users 表
/*
 Navicat Premium Data Transfer

 Source Server         : Mysql
 Source Server Type    : MySQL
 Source Server Version : 80026
 Source Host           : localhost:3306
 Source Schema         : tsingby

 Target Server Type    : MySQL
 Target Server Version : 80026
 File Encoding         : 65001

 Date: 23/12/2021 18:07:15
*/
-- ----------------------------
-- Table structure for users
-- ----------------------------
DROP TABLE IF EXISTS `users`;
CREATE TABLE `users`  (
  `userId` int NOT NULL AUTO_INCREMENT,
  `username` varchar(50) CHARACTER SET utf8mb4 COLLATE utf8mb4_0900_ai_ci NOT NULL COMMENT '账号',
  `password` varchar(50) CHARACTER SET utf8mb4 COLLATE utf8mb4_0900_ai_ci NOT NULL COMMENT '密码',
  `mail` varchar(50) CHARACTER SET utf8mb4 COLLATE utf8mb4_0900_ai_ci NULL DEFAULT NULL COMMENT '邮箱',
  PRIMARY KEY (`userId`) USING BTREE,
  INDEX `mail`(`mail`) USING BTREE
) ENGINE = InnoDB CHARACTER SET = utf8mb4 COLLATE = utf8mb4_0900_ai_ci ROW_FORMAT = Dynamic;

SET FOREIGN_KEY_CHECKS = 1;
(2)、pom.xml
的build—> plugins 标签引入如下plugin标签
<plugin>
                <groupId>org.mybatis.generator</groupId>
                <artifactId>mybatis-generator-maven-plugin</artifactId>
                <version>1.3.2</version>

                <!--插件设置-->
                <configuration>
                    <!--自动生成配置 如果名字是generatorConfig.xml并且直接放在resources文件夹下可以省略配置-->
                    <!--<configurationFile>src/main/resources/generatorConfig.xml</configurationFile>-->

                    <configurationFile>${basedir}/src/main/resources/config/generatorConfig.xml</configurationFile>
                    <!--允许移动生成的文件-->
                    <verbose>true</verbose>
                    <!--启用覆盖-->
                    <overwrite>true</overwrite>


                </configuration>
                <dependencies>
                    <dependency>
                        <groupId>mysql</groupId>
                        <artifactId>mysql-connector-java</artifactId>
                        <version>8.0.27</version>
                    </dependency>
                </dependencies>
            </plugin>
*注意
需要在 plugin 引入你的和 mysql 版本一致的 mysql-connector-java,我 mysql 是 8 版本的,所以引用的是<version>8.0.27</version>
之后刷新 maven,出现下面的插件就是成功了
完整的 pom.xml
<?xml version="1.0" encoding="UTF-8"?>
<project xmlns="http://maven.apache.org/POM/4.0.0" xmlns:xsi="http://www.w3.org/2001/XMLSchema-instance"
         xsi:schemaLocation="http://maven.apache.org/POM/4.0.0 https://maven.apache.org/xsd/maven-4.0.0.xsd">
    <modelVersion>4.0.0</modelVersion>
    <parent>
        <groupId>org.springframework.boot</groupId>
        <artifactId>spring-boot-starter-parent</artifactId>
        <version>2.6.2</version>
        <relativePath/> <!-- lookup parent from repository -->
    </parent>
    <groupId>com.mqb</groupId>
    <artifactId>springboot02</artifactId>
    <version>0.0.1-SNAPSHOT</version>
    <name>springboot02</name>
    <description>springboot02</description>
    <properties>
        <java.version>1.8</java.version>
    </properties>
    <dependencies>
        <dependency>
            <groupId>org.springframework.boot</groupId>
            <artifactId>spring-boot-starter-web</artifactId>
        </dependency>
<!--        mapper-->
        <dependency>
            <groupId>org.springframework.boot</groupId>
            <artifactId>spring-boot-starter-jdbc</artifactId>
        </dependency>
        <dependency>
            <groupId>org.mybatis.spring.boot</groupId>
            <artifactId>mybatis-spring-boot-starter</artifactId>
            <version>2.2.0</version>
        </dependency>
        <dependency>
            <groupId>mysql</groupId>
            <artifactId>mysql-connector-java</artifactId>
            <scope>runtime</scope>
        </dependency>

        <dependency>
            <groupId>com.alibaba</groupId>
            <artifactId>druid-spring-boot-starter</artifactId>
            <version>1.2.8</version>
        </dependency>

        <dependency>
            <groupId>org.springframework.boot</groupId>
            <artifactId>spring-boot-starter-test</artifactId>
            <scope>test</scope>
        </dependency>
        <dependency>
            <groupId>org.springframework.boot</groupId>
            <artifactId>spring-boot-starter-thymeleaf</artifactId>
        </dependency>

    </dependencies>

    <build>
        <!-- 如果不添加此节点mybatis的mapper.xml文件都会被漏掉。 -->
        <resources>
<!--            一定要添加,以防资源找不到-->
            <resource>
                <directory>src/main/java</directory>
                <includes>
                    <include>**/*.properties</include>
                    <include>**/*.xml</include>
                    <include>**/*.yaml</include>
                </includes>
                <filtering>false</filtering>
            </resource>
            <resource>
                <directory>src/main/resources</directory>
                <includes>
                    <include>**/*.properties</include>
                    <include>**/*.xml</include>
                    <include>**/*.yaml</include>
                </includes>
                <filtering>false</filtering>
            </resource>
        </resources>
        <plugins>
            <plugin>
                <groupId>org.springframework.boot</groupId>
                <artifactId>spring-boot-maven-plugin</artifactId>
            </plugin>
            <plugin>
                <groupId>org.mybatis.generator</groupId>
                <artifactId>mybatis-generator-maven-plugin</artifactId>
                <version>1.3.2</version>

                <!--插件设置-->
                <configuration>
                    <!--自动生成配置 如果名字是generatorConfig.xml并且直接放在resources文件夹下可以省略配置-->
                    <!--<configurationFile>src/main/resources/generatorConfig.xml</configurationFile>-->

                    <configurationFile>${basedir}/src/main/resources/config/generatorConfig.xml</configurationFile>
                    <!--允许移动生成的文件-->
                    <verbose>true</verbose>
                    <!--启用覆盖-->
                    <overwrite>true</overwrite>


                </configuration>
                <dependencies>
                    <dependency>
                        <groupId>mysql</groupId>
                        <artifactId>mysql-connector-java</artifactId>
                        <version>8.0.27</version>
                    </dependency>
                </dependencies>
            </plugin>
        </plugins>
    </build>

</project>
(3)、编写配置文件
generatorConfig.xml
<?xml version="1.0" encoding="UTF-8"?>
<!DOCTYPE generatorConfiguration
PUBLIC "-//mybatis.org//DTD MyBatis Generator Configuration 1.0//EN"
"http://mybatis.org/dtd/mybatis-generator-config_1_0.dtd">
<!-- 配置生成器 -->
<generatorConfiguration>
<!--<classPathEntry location="D:\java\apache-maven-3.8.1-bin\apache-maven-3.8.1\resources\mysql\mysql-connector-java\8.0.27\mysql-connector-java-8.0.27.jar"/>-->
<context id="DB2Tables" targetRuntime="MyBatis3">
<commentGenerator>
<property name="suppressDate" value="true"/>
<!-- 是否去除自动生成的注释 true:是 : false:否 -->
<property name="suppressAllComments" value="true"/>
</commentGenerator>
<!-- 数据库链接URL,用户名、密码 -->
<jdbcConnection driverClass="com.mysql.cj.jdbc.Driver"
connectionURL="jdbc:mysql://localhost:3306/tsingby?serverTimezone=GMT%2B8&useSSL=false"
userId="root" password="root">
<!-- 仅仅查询当前库的表,不去查询其他库 -->
<property name="nullCatalogMeansCurrent" value="true"/>
<property name="remarksReporting" value="true"/>
</jdbcConnection>
<!-- 类型转换 -->
<javaTypeResolver>
<!-- 是否使用BigDecimals,false可自动转化以下类型(Long Integer Short等) -->
<property name="forceBigDecimals" value="false"/>
</javaTypeResolver>
<!-- 生成模型的包名和位置
targetPackage : 生成User实体类存放的文件夹
-->
<javaModelGenerator targetPackage="com.mqb.springboot02.pojo" targetProject="src/main/java">
<!-- <javaModelGenerator targetPackage="com.mqb.springboot02.pojo" targetProject=".\src\main\java">-->
<!--enableSubPackages:如果true,MBG会根据catalog和schema来生成子包。
如果false就会直接用targetPackage属性。默认为false。-->
<property name="enableSubPackages" value="true"/>
<!--trimStrings:是否对数据库查询结果进行trim操作,
如果设置为true就会生成类似这样
public void setUsername(String username) {
this.username = username == null ? null : username.trim();
}的setter方法。默认值为false。-->
<property name="trimStrings" value="true"/>
</javaModelGenerator>
<!-- targetPackage:生成mapper.xml映射文件的包名-->
<!-- 接口和mapper映射文件可以分开放,也可以放一起,本例放一起-->
<sqlMapGenerator targetPackage="com.mqb.springboot02.mapper" targetProject="src/main/java">
<!-- 接口和mapper映射文件分开放-->
<!-- <sqlMapGenerator targetPackage="mappers" targetProject="src/main/resources">-->
<property name="enableSubPackages" value="true"/>
</sqlMapGenerator>
<!-- targetPackage:生成Mapper也就是dao接口的包名 -->
<!-- 客户端代码,生成易于使用的针对Model对象和XML配置文件 的代码
type="ANNOTATEDMAPPER",生成Java Model 和基于注解的Mapper对象
type="MIXEDMAPPER",生成基于注解的Java Model 和相应的Mapper对象
type="XMLMAPPER",生成SQLMap XML文件和独立的Mapper接口
-->
<javaClientGenerator type="XMLMAPPER" targetPackage="com.mqb.springboot02.mapper" targetProject="src/main/java">
<property name="enableSubPackages" value="true"/>
</javaClientGenerator>
<!-- 要生成的表 tableName是数据库中的表名或视图名 domainObjectName是实体类名-->
<table tableName="users" domainObjectName="User" enableCountByExample="false"
enableUpdateByExample="false" enableDeleteByExample="false"
enableSelectByExample="false" selectByExampleQueryId="false">
<!-- 是否使用实际列名-->
<!-- true MyBatis Generator会使用数据库中实际的字段名字作为生成的实体类的属性名。
false(默认值)。如果设置为false,则MyBatis Generator会将数据库中实际的字段名字转换为驼峰式风格作为生成的实体类的属性名。-->
<property name="useActualColumnNames" value="false"/>
<!-- 数据库表主键 -->
<generatedKey column="userId" sqlStatement="Mysql" identity="true"/>
</table>
</context>
</generatorConfiguration>
application.yaml
spring:
  datasource:
    url: jdbc:mysql://localhost:3306/tsingby?serverTimezone=GMT%2B8&useSSL=false
    username: root
    password: root

    type: com.alibaba.druid.pool.DruidDataSource
    driver-class-name: com.mysql.cj.jdbc.Driver
mybatis:
  # 全局的映射,不用在xml文件写实体类的全路径
  type-aliases-package: com.mqb.springboot02.pojo
点击 mybatis-generator:generate 插件,查看是否生成 mapper 和映射文件

多出来的文件都是自动生成的,我没手动加任何文件
(4)、查看生成的文件
User.java
package com.mqb.springboot02.pojo;

import org.springframework.context.annotation.Bean;


public class User {
    private Integer userid;

    private String username;

    private String password;

    private String mail;

    public Integer getUserid() {
        return userid;
    }

    public void setUserid(Integer userid) {
        this.userid = userid;
    }

    public String getUsername() {
        return username;
    }

    public void setUsername(String username) {
        this.username = username == null ? null : username.trim();
    }

    public String getPassword() {
        return password;
    }

    public void setPassword(String password) {
        this.password = password == null ? null : password.trim();
    }

    public String getMail() {
        return mail;
    }

    public void setMail(String mail) {
        this.mail = mail == null ? null : mail.trim();
    }
}
UserMapper.java 接口
package com.mqb.springboot02.mapper;

import com.mqb.springboot02.pojo.User;
import org.springframework.stereotype.Component;
import org.springframework.stereotype.Repository;
import org.springframework.web.bind.annotation.ResponseBody;

@Repository
public interface UserMapper {
    int deleteByPrimaryKey(Integer userid);

    int insert(User record);

    int insertSelective(User record);

    User selectByPrimaryKey(Integer userid);

    int updateByPrimaryKeySelective(User record);

    int updateByPrimaryKey(User record);
}
Usermapper.xml
<?xml version="1.0" encoding="UTF-8" ?>
<!DOCTYPE mapper PUBLIC "-//mybatis.org//DTD Mapper 3.0//EN" "http://mybatis.org/dtd/mybatis-3-mapper.dtd" >
<mapper namespace="com.mqb.springboot02.mapper.UserMapper" >
  <resultMap id="BaseResultMap" type="com.mqb.springboot02.pojo.User" >
    <id column="userId" property="userid" jdbcType="INTEGER" />
    <result column="username" property="username" jdbcType="VARCHAR" />
    <result column="password" property="password" jdbcType="VARCHAR" />
    <result column="mail" property="mail" jdbcType="VARCHAR" />
  </resultMap>
  <sql id="Base_Column_List" >
    userId, username, password, mail
  </sql>
  <select id="selectByPrimaryKey" resultMap="BaseResultMap" parameterType="java.lang.Integer" >
    select
    <include refid="Base_Column_List" />
    from users
    where userId = #{userid,jdbcType=INTEGER}
  </select>
  <delete id="deleteByPrimaryKey" parameterType="java.lang.Integer" >
    delete from users
    where userId = #{userid,jdbcType=INTEGER}
  </delete>
  <insert id="insert" parameterType="com.mqb.springboot02.pojo.User" >
    <selectKey resultType="java.lang.Integer" keyProperty="userid" order="AFTER" >
      SELECT LAST_INSERT_ID()
    </selectKey>
    insert into users (username, password, mail
      )
    values (#{username,jdbcType=VARCHAR}, #{password,jdbcType=VARCHAR}, #{mail,jdbcType=VARCHAR}
      )
  </insert>
  <insert id="insertSelective" parameterType="com.mqb.springboot02.pojo.User" >
    <selectKey resultType="java.lang.Integer" keyProperty="userid" order="AFTER" >
      SELECT LAST_INSERT_ID()
    </selectKey>
    insert into users
    <trim prefix="(" suffix=")" suffixOverrides="," >
      <if test="username != null" >
        username,
      </if>
      <if test="password != null" >
        password,
      </if>
      <if test="mail != null" >
        mail,
      </if>
    </trim>
    <trim prefix="values (" suffix=")" suffixOverrides="," >
      <if test="username != null" >
        #{username,jdbcType=VARCHAR},
      </if>
      <if test="password != null" >
        #{password,jdbcType=VARCHAR},
      </if>
      <if test="mail != null" >
        #{mail,jdbcType=VARCHAR},
      </if>
    </trim>
  </insert>
  <update id="updateByPrimaryKeySelective" parameterType="com.mqb.springboot02.pojo.User" >
    update users
    <set >
      <if test="username != null" >
        username = #{username,jdbcType=VARCHAR},
      </if>
      <if test="password != null" >
        password = #{password,jdbcType=VARCHAR},
      </if>
      <if test="mail != null" >
        mail = #{mail,jdbcType=VARCHAR},
      </if>
    </set>
    where userId = #{userid,jdbcType=INTEGER}
  </update>
  <update id="updateByPrimaryKey" parameterType="com.mqb.springboot02.pojo.User" >
    update users
    set username = #{username,jdbcType=VARCHAR},
      password = #{password,jdbcType=VARCHAR},
      mail = #{mail,jdbcType=VARCHAR}
    where userId = #{userid,jdbcType=INTEGER}
  </update>
</mapper>
(4)、测试
-
在 UserMapper.java 类上添加@Repository 注解
-
编写 Userservice 接口,只使用一个方法测试
package com.mqb.springboot02.userService;

import com.mqb.springboot02.pojo.User;

public interface UserService {
    User selectByPrimaryKey(Integer userid);
} -
UserServiceIMmpl 实现类
package com.mqb.springboot02.userService.userServiceImpl;

import com.mqb.springboot02.mapper.UserMapper;
import com.mqb.springboot02.pojo.User;
import com.mqb.springboot02.userService.UserService;
import org.springframework.beans.factory.annotation.Autowired;
import org.springframework.stereotype.Service;

@Service
public class UserServiceImpl implements UserService {
    @Autowired
    UserMapper userMapper;
    @Override
    public User selectByPrimaryKey(Integer userid) {
        return userMapper.selectByPrimaryKey(userid);
    }
} -
UserController
package com.mqb.springboot02.controller;

import com.mqb.springboot02.pojo.User;
import com.mqb.springboot02.userService.UserService;
import org.springframework.beans.factory.annotation.Autowired;
import org.springframework.stereotype.Controller;
import org.springframework.web.bind.annotation.RequestMapping;
import org.springframework.web.bind.annotation.ResponseBody;

@Controller
@ResponseBody
public class UserController {
    @Autowired
    UserService userService;

    @RequestMapping("/test")
    public User test(){
        return userService.selectByPrimaryKey(1);
    }
}
在启动主程序添加@MapperScan()注解,扫描 mapper
package com.mqb.springboot02;

import org.mybatis.spring.annotation.MapperScan;
import org.springframework.boot.SpringApplication;
import org.springframework.boot.autoconfigure.SpringBootApplication;
@MapperScan("com.mqb.springboot02.mapper")
@SpringBootApplication
public class Springboot02Application {

    public static void main(String[] args) {
        SpringApplication.run(Springboot02Application.class, args);
    }

}
放上目录结构
启动 springboot 项目,浏览器访问localhost:8080,出现信息,成功
springboot 分页插件
配置文件
 <dependency>
            <groupId>com.github.pagehelper</groupId>
            <artifactId>pagehelper-spring-boot-starter</artifactId>
            <version>1.2.5</version>
</dependency>
1、springboot yaml 配置
spring:
  datasource:
    driver-class-name: com.mysql.cj.jdbc.Driver
    url: jdbc:mysql://localhost:3306/tsingby?serverTimezone=GMT%2B8&useSSL=false
    username: root
    password: root

#mapper.xml文件放在resources/mapping/
mybatis:
  mapper-locations: classpath:mapping/*Mapper.xml

pagehelper:
  # dialect: ①
  # 分页插件会自动检测当前的数据库链接,自动选择合适的分页方式(可以不设置)
  helper-dialect: mysql
  # 上面数据库设置后,下面的设置为true不会改变上面的结果(默认为true)
  auto-dialect: true
  page-size-zero: false # ②
  reasonable: true # ③
  # 默认值为 false,该参数对使用 RowBounds 作为分页参数时有效。(一般用不着)
  offset-as-page-num: false
  # 默认值为 false,RowBounds是否进行count查询(一般用不着)
  row-bounds-with-count: false
  #params: ④
  #support-methods-arguments: 和params配合使用,具体可以看下面的讲解
  # 默认值为 false。设置为 true 时,允许在运行时根据多数据源自动识别对应方言的分页
  auto-runtime-dialect: false # ⑤
  # 与auto-runtime-dialect配合使用
  close-conn: true
2、SSM xml 配置方法
依赖
        <dependency>
            <groupId>com.github.pagehelper</groupId>
            <artifactId>pagehelper</artifactId>
            <version>4.2.1</version>
        </dependency>
写在 mybatis.xml 文件中
<plugins>
        <!-- com.github.pagehelper为PageHelper类所在包名 -->
        <plugin interceptor="com.github.pagehelper.PageHelper">
            <property name="dialect" value="mysql"/>
            <!-- 该参数默认为false -->
            <!-- 设置为true时,会将RowBounds第一个参数offset当成pageNum页码使用 -->
            <!-- 和startPage中的pageNum效果一样-->
            <property name="offsetAsPageNum" value="true"/>
            <!-- 该参数默认为false -->
            <!-- 设置为true时,使用RowBounds分页会进行count查询 -->
            <property name="rowBoundsWithCount" value="true"/>
            <!-- 设置为true时,如果pageSize=0或者RowBounds.limit = 0就会查询出全部的结果 -->
            <!-- (相当于没有执行分页查询,但是返回结果仍然是Page类型)-->
            <property name="pageSizeZero" value="true"/>
            <!-- 3.3.0版本可用 - 分页参数合理化,默认false禁用 -->
            <!-- 启用合理化时,如果pageNum<1会查询第一页,如果pageNum>pages会查询最后一页 -->
            <!-- 禁用合理化时,如果pageNum<1或pageNum>pages会返回空数据 -->
            <property name="reasonable" value="true"/>
        </plugin>
    </plugins>
用法
-
从数据库中查询的数据放在 List 集合中,
list -
PageInfo<list> pageInfo = new PageInfo<>(list); -
将
pageInfo传给前端
PageInfo 的字段
//当前页
private int pageNum;
//每页的数量
private int pageSize;
//当前页的数量
private int size;
//由于startRow和endRow不常用,这里说个具�体的用法
//可以在页面中"显示startRow到endRow 共size条数据"
//当前页面第一个元素在数据库中的行号
private int startRow;
//当前页面最后一个元素在数据库中的行号
private int endRow;
//总页数
private int pages;
//前一页
private int prePage;
//下一页
private int nextPage;
//是否为第一页
private boolean isFirstPage = false;
//是否为最后一页
private boolean isLastPage = false;
//是否有前一页
private boolean hasPreviousPage = false;
//是否有下一页
private boolean hasNextPage = false;
//导航页码数
private int navigatePages;
//所有导航页号
private int[] navigatepageNums;
//导航条上的第一页
private int navigateFirstPage;
//导航条上的最后一页
private int navigateLastPage;
测试代码
@RestController
public class tt {
    @Autowired
    PositionService service;
    //Restful风格
    @RequestMapping("/")

    public Object queryAllPosition() {

        PageHelper.startPage(2, 5);//一定要放在查询的select之前,并且只会分页离得最近的select
        List<Position> list1=service.queryAllPosition();
        List<Position> list2=service.queryAllPosition();//不会被分页

        return new PageInfo<>(list1);
    }

}
@ConfigurationProperties 用法
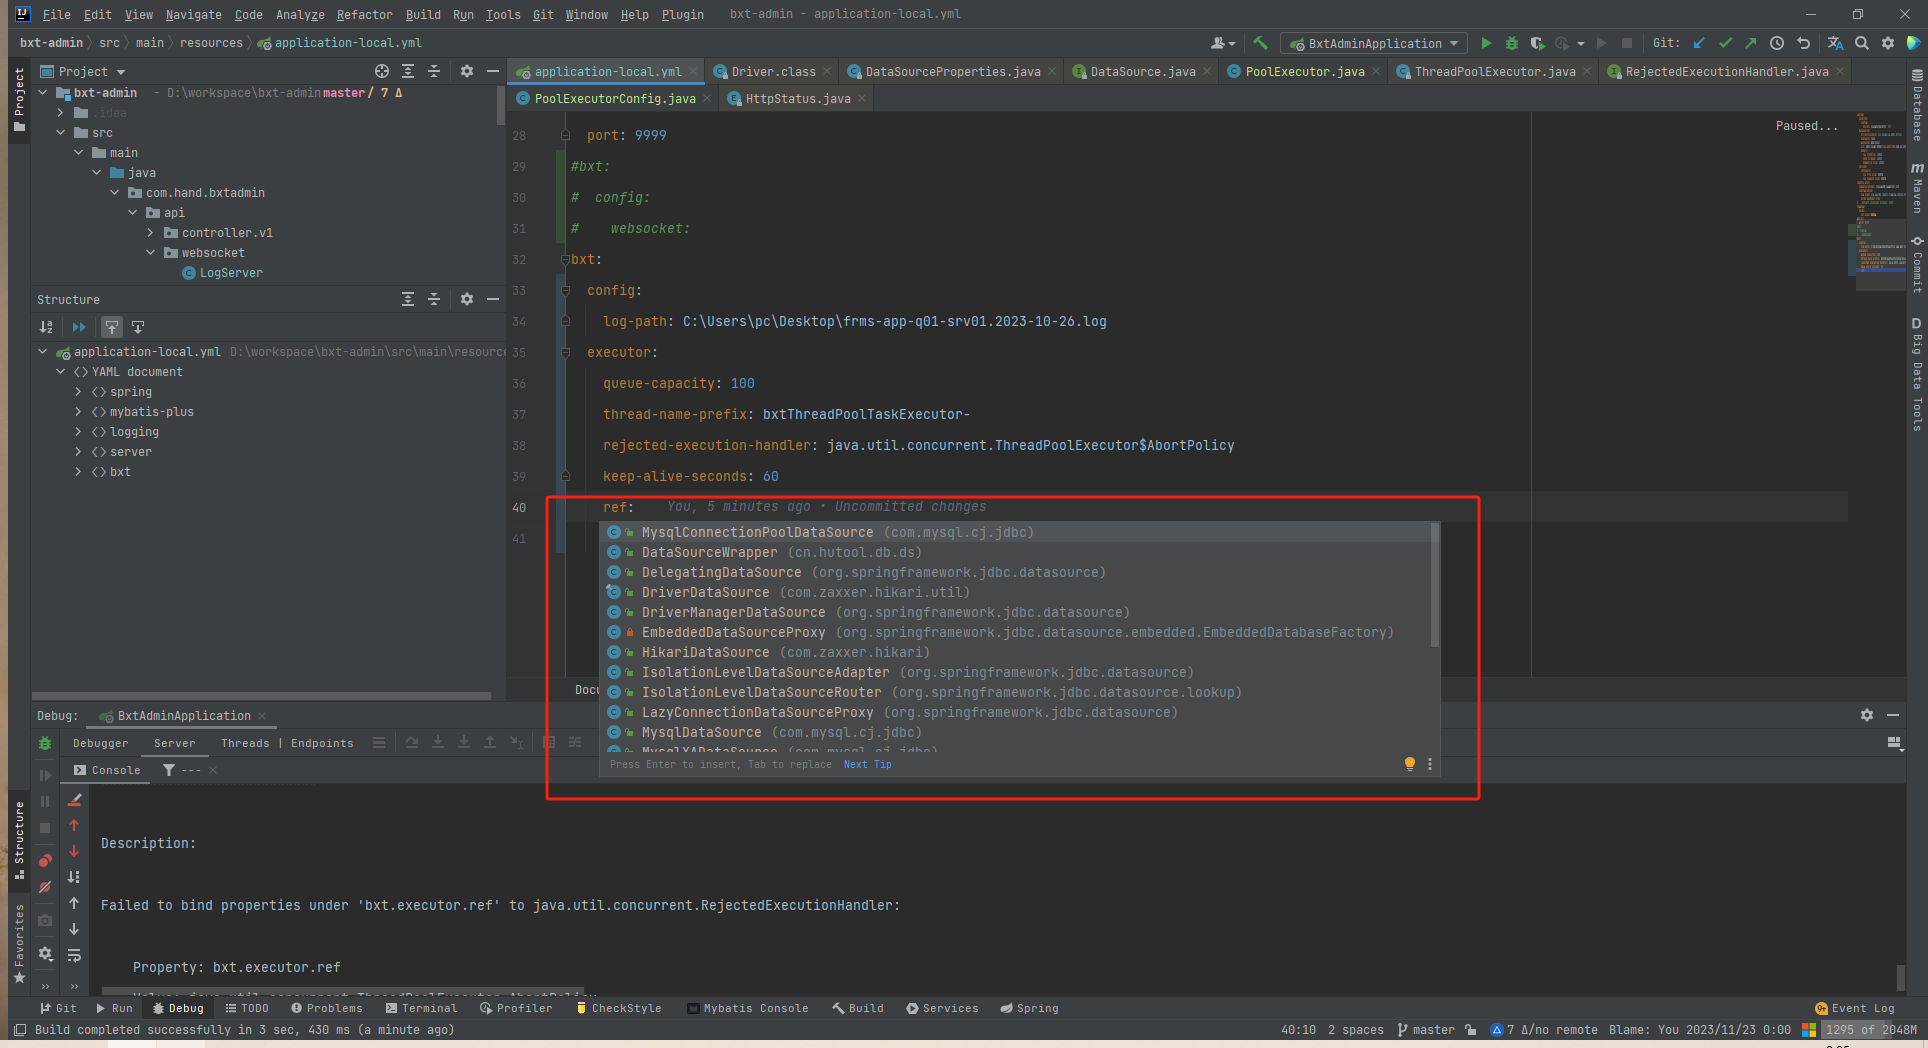
private Class<? extends DataSource> ref;自动提示实现类
@Component
@Data
@Log4j2
@ConfigurationProperties("bxt.executor")
   public class PoolExecutorConfig {
       private Class<? extends DataSource> ref;
  }

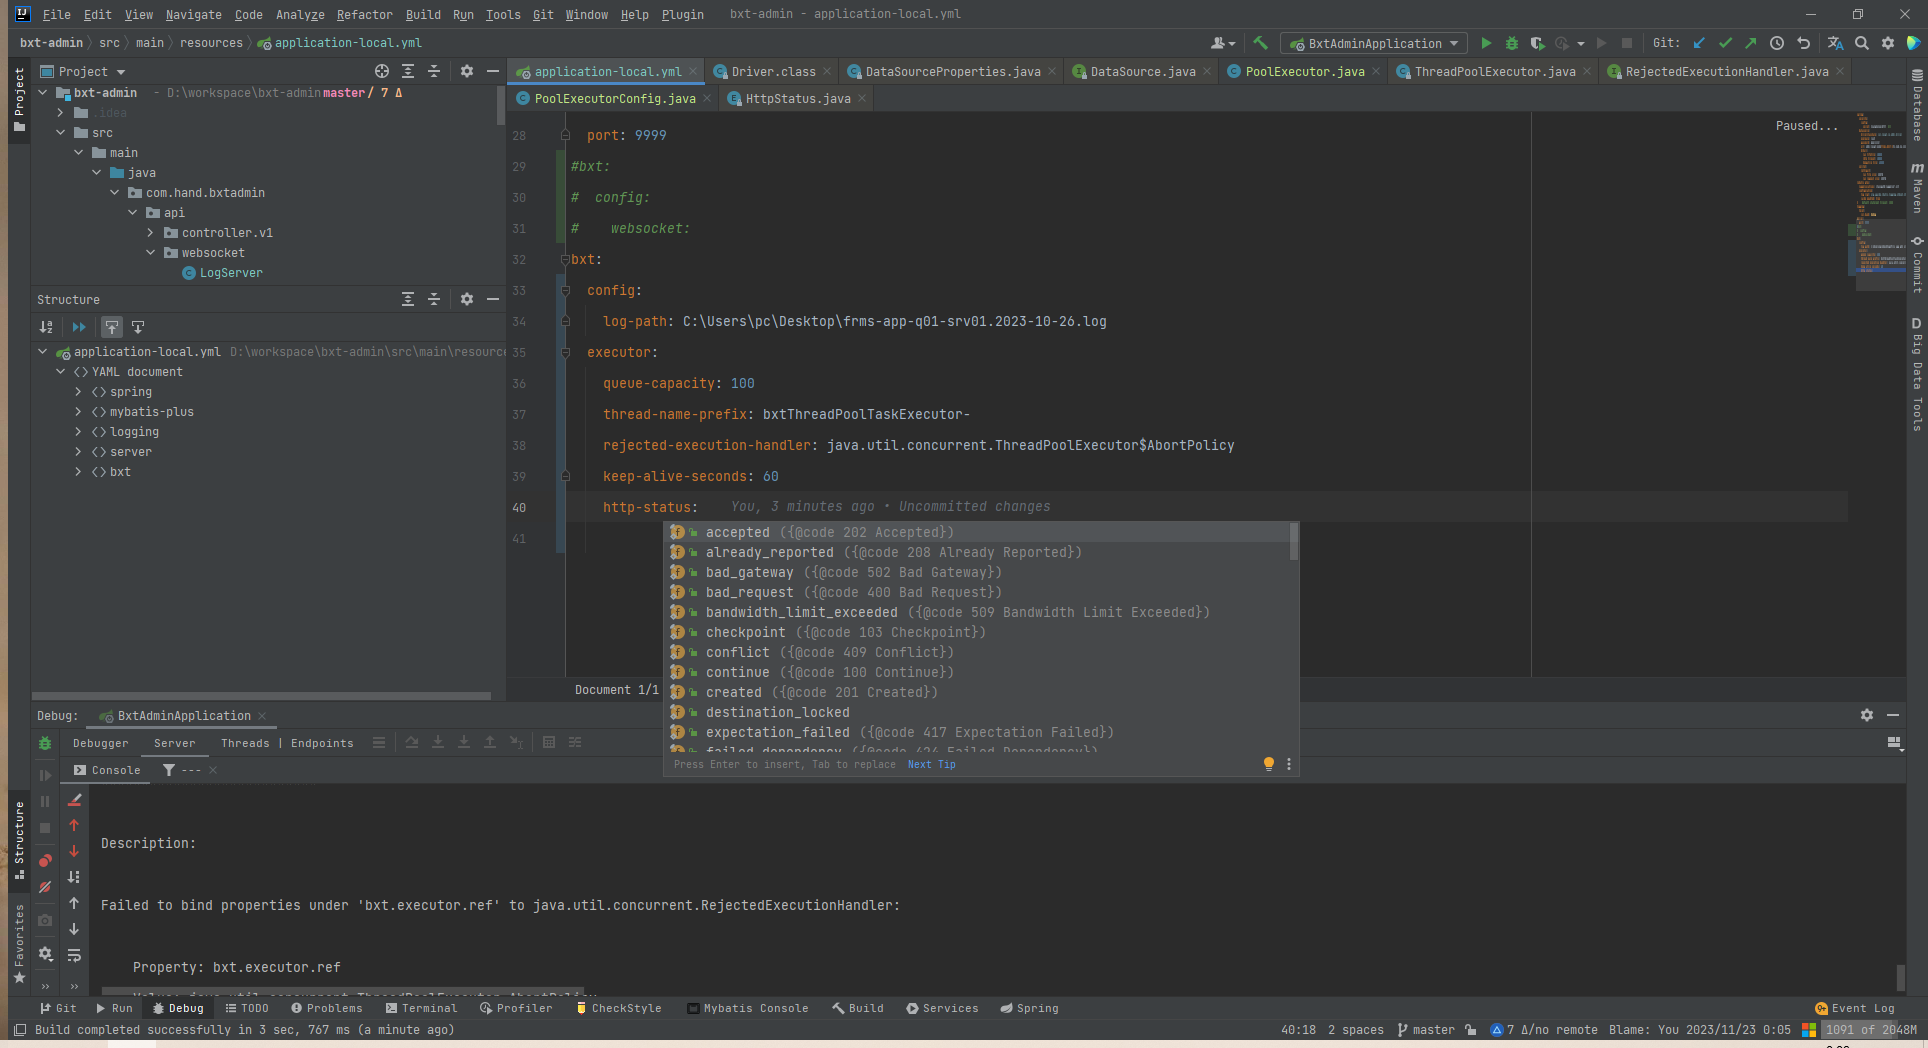
- 自动提示枚举类
@Component
@Data
@Log4j2
@ConfigurationProperties("bxt.executor")
public class PoolExecutorConfig {
    private HttpStatus httpStatus;
}

@Async 和 CompletableFuture
@Async 和 CompletableFuture 是实现异步处理的强大工具组合。@Async 是Spring框架提供的一个注解,用于标记方法以表明它将在Spring管理的线程池中的另一个线程上异步执行。这使得开发人员能够在不阻塞主线程的情况下执行耗时的任务,从而提高应用程序的整体性能和响应速度。CompletableFuture 是Java 8引入的一个强大的类,它代表了一个可能尚未完成的计算的结果。CompletableFuture 提供了丰富的API来支持异步编程模式,如回调、组合操作、错误处理等。通过将@Async与CompletableFuture结合使用,可以实现更高效的异步任务处理。接下来,我们将介绍@Async与CompletableFuture结合的使用。
开启异步功能并配置线程池
Spring 自带 @EnableAsync 注解,可应用于 @Configuration 类以实现异步行为。@EnableAsync 注解会查找标有 @Async 注解的方法,并在后台线程池中运行这些方法。 @Async 注解方法在单独的线程中执行,并返回 CompletableFuture 来保存异步计算的结果。
@Configuration

@EnableAsync

public class AsyncConfig {

  @Bean(name = "asyncExecutor")

  public Executor asyncExecutor()  {

        int core = Runtime.getRuntime().availableProcessors() ;

        ThreadPoolTaskExecutor executor = new ThreadPoolTaskExecutor();

        executor.setCorePoolSize(core) ;

        executor.setMaxPoolSize(core) ;

        executor.setQueueCapacity(100) ;

        executor.setThreadNamePrefix("PackAsync-") ;

        executor.initialize() ;

        return executor ;
   }
}
创建异步任务
@Async("asyncExecutor")public CompletableFuture<EmployeeNames> task() { // TODO}
多个异步任务同时执行
CompletableFuture.allOf( asyncMethodOne, asyncMethodTwo, asyncMethodThree).join() ;